Star Diagnosis SDS MB SD Connect C4 review on SL-Class (R230) : from package to install to a complete package without going through configuration, installation.
The MB sdconnect c4 package arrived last week.
I bought it here:
https://www.obd2tool.com/goods-334-MB+SD+Connect+Compact+4+Star+Diagnostic+Tool+With+WiFi.html
It came well packed:
Within the time frame promised by the seller.
– 4 days to clear the payment, irrelevant on the payment method used.
– shipped the following day.
– arrived by DHL in 3 working days.
I just got the time now and I’m in the process of setting it up.
1. SSD installation.
– for some reason the SSD drive is not being guided to the drive sockets on the laptop. Laptop bottom case removal may be necessary for proper installation. (Originally I thought that the drive was bad)
– I contacted the seller and the response was swift.
I needed to know if I can connect the SSD elsewhere to confirm it’s functionality. (I was afraid to corrupt files in the process as it was a dedicated drive.)
– Drive confirmed to be functional. It was the drive bay holder of the Dell D630 that guided the SSD drive incorrectly. I guess it was design for mechanical drives which are quite thicker. In the future case disassemble can be avoided.
Do not attach the drive bracket, place thin piece of cardboard on the drive (to match the thickness of the original drive) and carefully slide it in. Remove the cardboard. Install the bracket.
– SSD installed, case put back together, laptop bots up OK
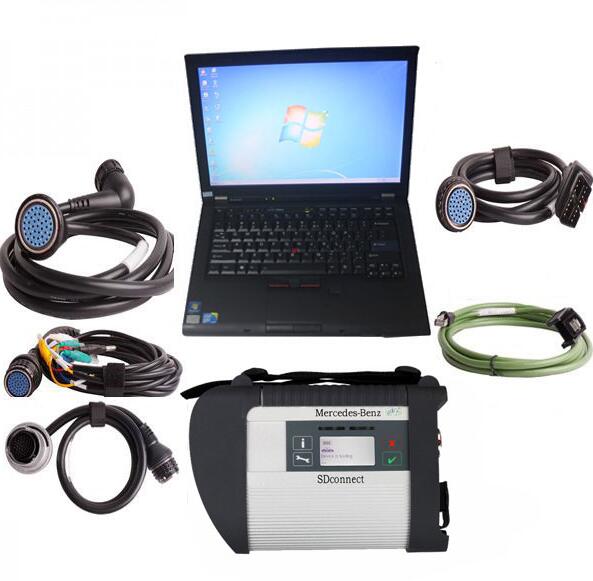
System components:
– (As most probably notice from the posts bellow,) installation is based on the Dell D630.
– 4G of Ram (only 3 usable)
– SSD 240G, Sata3
– Running Win 7 Ultimate, 32bit.
– C4 Multiplexer with option to connect via; LAN cable and wireless in two ways (workshop and road24)
Initial setup;
– Laptop was somewhat slow to respond in first few boot sequences.
– Some drivers had to be manually installed. One needs to pay close attention to their size.
– Ewa setup was very clearly explained in the included file yet it would get lost every other time the compute got rebooted. Re-install did not help. Since seller provides initial support I took him up on the offer and got this resolved in less than a day. He did not disclose what was corrected.
– I purchased 10ft LAN cable for the MUX (one comes included but is not so flexible and on the heavy side). I also got an inexpensive router to setup an independent network. Nothing complicated here – if you can connect your own computer to the router at home than you can do this as well.
– 800×600 are not the resolution many of us want to use now days. So now was the time to improve the graphics a bit. And if you ask than No, I still cannot run the latest F1 simulator J. Although the resolution are usable and the second screen option is available, should one be needed/desired. The Intel driver 6.14.10.4926 is not the latest but seems the best match when it comes to stability in the above system. Resolutions settings of 1280×768 fills the SDS screens quite nice.
– SSD size. The drive included in the package comes filed to the brim. Stays in red at all times. Once again decision needs to be made in order to ease the strain on the system, improve the speed, and allow some space for future reports. (I’m not asking for much here but we all know it adds up pretty quick) There are two choices, you can either move some files to the external drive (and probably never find them again) or spend few bucks on a bigger SSD and transfer the complete system as an hardware upgrade (if you think you are not up to the task than local computer shop can do this for you dirt cheap provided you purchase the SSD from them).
– For those who are thinking about this system and have not yet purchased it, there is the third option – Ask the seller to use 500G SSD
Seller support;
– Available and fairly responsive.
– Future buyers need to consider time difference in between the home land and China (if support is to be used). North America give or take 12 hours.
Initial use results and observation;
– Win(only) boot time – 56sec.
– Win with network – 1m. 46s.
– SDS (v2019) start – 49sec.
– C4 MUX boot time – 26 sec.
– Xentry start – 49sec.
– Initial connect to MUX – <10s. in all 3 net. conditions (LAN, workshop, Road24)
– To establish com. layer – 1min. 14sec.
– Quick Test served as the network guinea pig and the scan times are as follow;
· Workshop – 3min. 37sec.
· Road 24 – 4min. 29sec
· LAN cable – 3min. 9sec.
· Browsing/time it takes to move through the screens (retrieve code) is very reasonable especially in the LAN/cable mode.
– So far the only shortcoming (not sure if it’s software or hardware) is the lack of auto VIN detection. The button is present on the screen, it initialises the check but gets nowhere. Manual input is needed. Not a big deal I guess.
– I have browse through most troublesome sections (for R230) like ABC and find it well organized. I hope the rest is just like it.
For me to sum it up and close this post in few words you need to know that I previously only owned generic code scanners. Now I feel like.
Question:
is there a place where a complete out of the box turn key SDS is available from? i would just like to buy the product and start using it without going through configuration, installation,…
Reply:
If you purchase the software pre-installed on a drive configured for a Dell D630, then there is none of the headache that most users are experiencing.
Here you go:

https://www.obd2tool.com/goods-335-MB+SD+Connect+Compact+4+Star+Diagnosis+Tool+Plus+Dell+D630+Laptop.html
or for a Lenovo T410 Laptop
https://www.obd2tool.com/goods-6877-MB-SD-Connect-C5C4-Star-Diagnosis-Plus-Lenovo-T410-Laptop.html
With all the cables, laptop, drive installed, software installed,… something where i get the package delivered to my house and i can start using out of the box.Once you have your kit from China and your Dell, plug the Chinese hard drive into the Dell, power it on, and use the included utility programs to activate the software just as you would activate a Microsoft Windows product.
Leave a Reply