Topic: How-To solve the error that 2010 Benz S550 got ” Air Suspension malfunction”. MB diagnostics like MB SD Connect C5 /Star C4 will play its role.
What to do:
need to have someone check for fault codes using MB diagnostics like MB sd connect C5 /C4 while doing so also re-calibrate suspension. DIY – check all sensors/connections, revisit struts and control valve for connection problems/leaks, check compressor harness/connection. Worst case scenario possible strut internal leakage in which case it would need to be replaced.
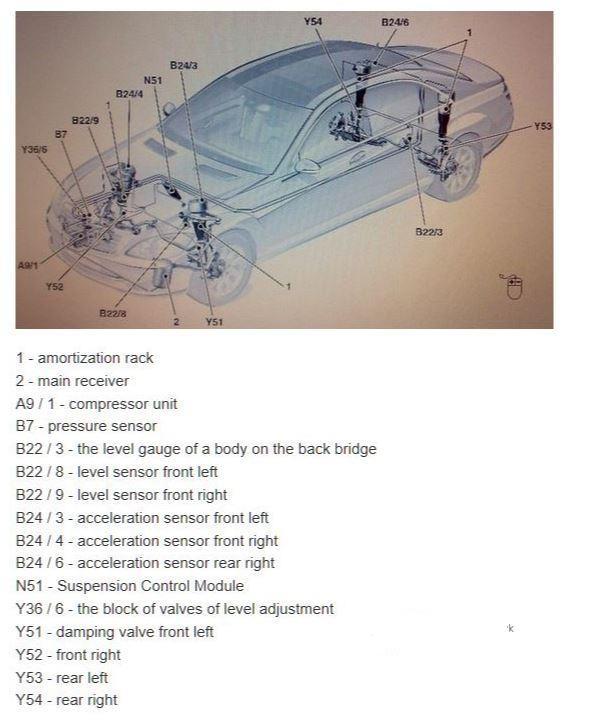
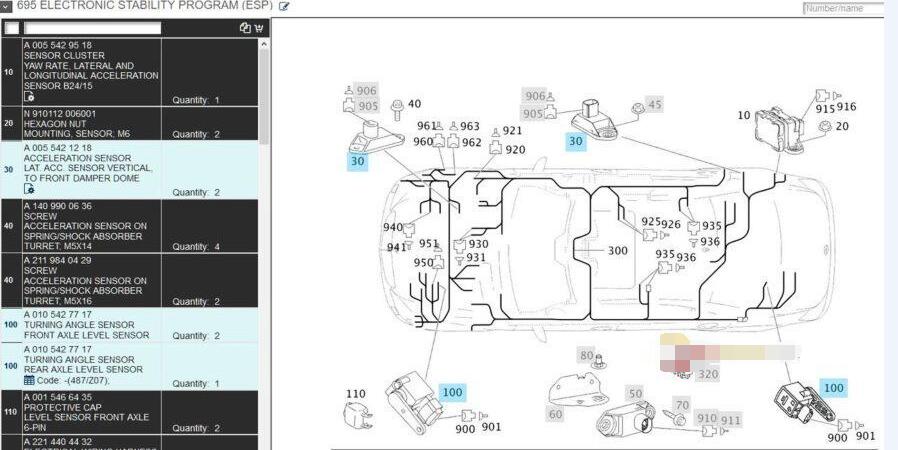
Suspension strut component description
Check AIRmatic for leaks
Here comes one question:
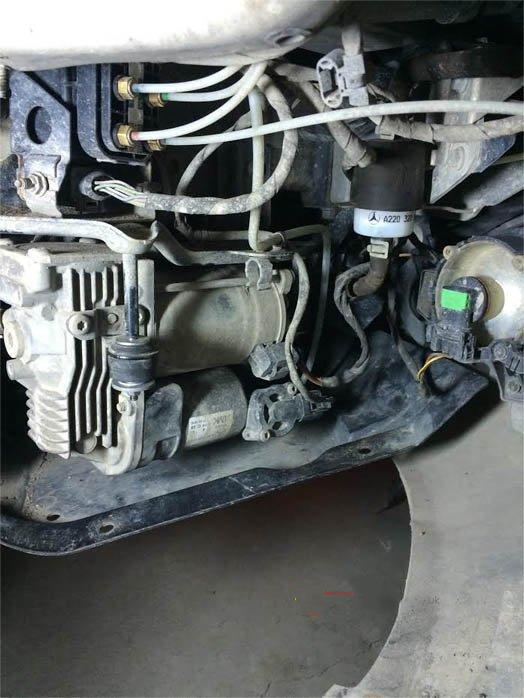
One question I have is around Y36/6, I don’t see that in my vehicle or at least not in that layout. If I look at the closeup of the Y36/6 in the attached document, it does not match what I see in the picture below, in the attachment/closeup I see 6 white rubber/plastic tubes coming out and the location is color coded but if you look at the picture y36/6 has 4 metal tubes coming out on the side, is it because the closeup is shown after a cover has been removed?
Also, on mine, on top of the compressor there is a silver metallic block that has 4 metal tubes coming out from the top and not from the sides, is the difference due to mine not being 4Matic?
Last but not the least, all the diag and re-calibration you talk about, can those be done through MB STAR Tool?
Here is the answer:
4matic does not matter, Y36/6 is the valve block @ compressor only thing that might appear different is labeling could be missing. STAR should accommodate re-calibration & diagnostics.
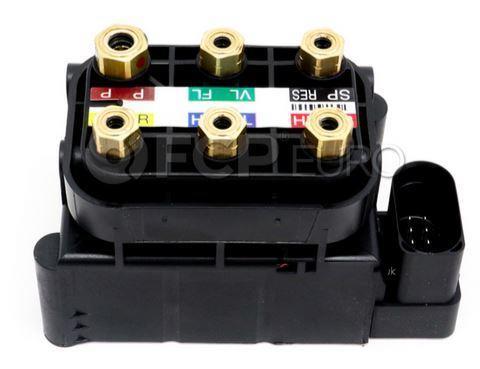
install air suspension valve unit
install compressor
install bottom engine compartment paneling
Finally, I purchased Benz C5 with SD disk, here is the link.
Compressor and valve unit are behind the bumper just in front of the right wheel. If you remove the right front wheel and the wheel well liner you will see the valve block.
Here’s the pic for quick reference
What’s the deal with jacking the car?
I typically follow the WIS procedures. For the suspension work you would normally want to release pressure from the struts in order to avoid damage to them or you. I’ve always done this via Xentry.
What type of lug?
After finally understanding how to locate and test the air leak at the valve, it turns out my wheels have special lugs all of them as opposed to one being the lock nut. It looks like flower, what gives??? I only have the usual MM impact wrench socket. What is it called and where to get it?
Reply: So, 17mm has been stock on many Mercedes for some time. The Convex (flower head) bolts appeared with the Maybach and then the W221 and are also on several other models. It is entirely possible that someone put 17mm hex head bolts on your car or even another size, do you have aftermarket wheels? You might just take a 17mm, 18mm, 19mm, etc. out to the car with you to see which one fits best. At the very least the lug wrench in the tool kit in the trunk should fit.
I fixed my Airmatic issues Friday, so relieved.
I replaced the valve block (which I suspect was actually fine) and as I was putting the lines back in, I noticed a very small crack on one of the strut air lines where it must have been bent around the brass fitting. I cut off the bad inch and reconnected the line to the fitting, and now the suspension works just fine. I drove it for 7 hours yesterday (road trip) and not a single problem manifested itself! I did a soapy water leak test but this must have been too small to see.
Regarding that additional pump/component in the fender: I was able to take off the torx bolts holding it to the bracket there and slide the part over to the right. It actually fit pretty nicely just resting on the bottom of the FR fender/bumper. Anyways, just sliding it out of the way gave me enough room to work on the valve block.
Basic steps:
Removed wheel and wheel fender liner
Removed 2 torx bolts holding that mystery part on then carefully slid it off the bracket and braced it against the bumper/fender. Be very careful not to mess with the pressure lines too much, I’m not sure how much flexing they’re rated for but it certainly isn’t much.
Use a 10 mm wrench to crack open all the fittings at the valve block and drain the air system (compressor fitting uses a 12 mm)
Unscrew the single screw holding the valve body on and then slide the whole thing out, vehicle right. A rubber fitting holds it on the other end, it just slides off
If you have the same problem, you might as well get the valve body JIC… and follow the video instructions.
Leave a Reply