To access the OBD II/EOBD diagnostics functions
1. Tap the Diagnostics application button from the Maxisys Job Menu. The Vehicle Menu displays.
2. Tap the EOBD button. There are two options to establish communication with the vehicle.
* Auto Scan – When this option is selected, the diagnostic tool attempts to establish communication using each protocol in order to determine which one the vehicle is broadcasting on.
* Protocol – When this option is selected, the screen opens a submenu of various protocols. A communication protocol is a standardized way of data communication between an ECM and a diagnostic tool. Global OBD may use several different communication protocols.
3. Select a specific protocol if the Protocol option is selected. Wait for the Autel Maxisys Elite OBD II Diagnostic Menu to appear.
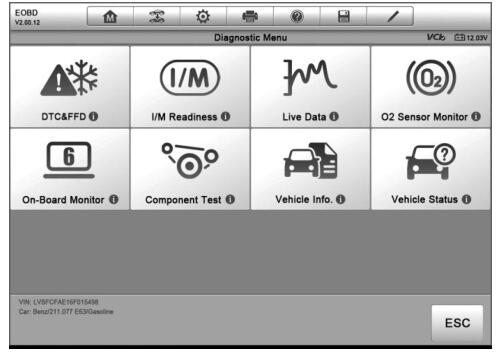
4. Select a function option to continue.
* DTC & FFD
* I/M Readiness
* Live Data
* O2 Sensor Monitor
* On-Board Monitor
* Component Test
* Vehicle Information
* Vehicle Status
Function Descriptions
This section describes the various functions of each diagnostic option: DTC & FFD When this function is selected, the screen displays a list of Stored Codes and Pending Codes. When the Freeze Frame data of certain DTCs are available for viewing, a snowflake button will display on the right side of the DTC item. The Erase Codes function can be applied by tapping the functional button at the lower bottom of the screen.
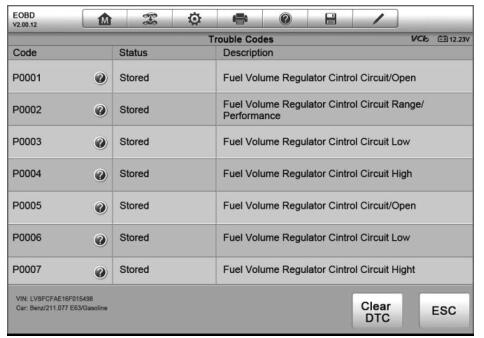
Stored Codes
Stored codes are the current emission related DTCs from the ECM of the vehicle. OBD II/EOBD Codes have a priority according to their emission severity, with higher priority codes overwriting lower priority codes. The priority of the code determines the illumination of the MIL and the codes erase procedure. Manufacturers rank codes differently, so expect to see differences between makes.
Pending Codes
These are codes whose setting conditions were met during the last drive cycle, but need to be met on two or more consecutive drive cycles before the DTC actually sets. The intended use of this service is to assist the service technician after a vehicle repair and after clearing diagnostic information, by reporting test results after a single driving cycle.
a) If a test failed during the driving cycle, the DTC associated with that test is reported. If the pending fault does not occur again within 40 to 80 warm-up cycles, the fault is automatically cleared from memory.
b) Test results reported by this service do not necessarily indicate a faulty component or system. If test results indicate another failure after additional driving, then a DTC is set to indicate a faulty component or system, and the MIL is illuminated.
* Freeze Frame
In most cases the stored frame is the OBD II Scanner that occurred. Certain DTCs, those that have a greater impact on vehicle emission, have a higher priority. In these cases, the highest priority DTC is the one for which the freeze frame records are retained. Freeze frame data includes a ―snapshot‖ of critical parameter values at the time the DTC is set.
* Erase Codes
This option is used to clear all emission related diagnostic data such as, DTCs, freeze frame data and manufacturer specific enhanced data from the vehicle’s ECM, and resets the I/M Readiness Monitor Status for all vehicle monitors to Not Ready or Not Complete status.
A confirmation screen displays when the clear codes option is selected to prevent accidental loss of data. Select Yes on the confirmation screen to continue, or No to exit.
I/M Readiness
This function is used to check the readiness of the monitoring system. It is an excellent function to use prior to having a vehicle inspected for compliance to a state emissions program. Selecting I/M Readiness opens a submenu with two choices:
* Since DTCs Cleared – displays the status of monitors since the last time the DTCs are erased.
* This Driving Cycle – displays the status of monitors since the beginning of the current drive cycle.
Live Data
This function displays the real time PID data from ECU. Displayed data includes analog inputs and outputs, digital inputs and outputs, and system status information broadcast on the vehicle data stream. Live data can be displayed in various modes, see 4.6.4 Live Data on page 43 for detailed information. O2 Sensor Monitor This option allows retrieval and viewing of O2 sensor monitor test results for the most recently performed tests from the vehicle’s on-board computer. The O2 Sensor Monitor test function is not supported by vehicles which communicate using a controller area network (CAN). For O2 Sensor Monitor tests results of CAN-equipped vehicles, refer to On-Board Monitor.
On-Board Monitor
This option allows you to view the results of On-Board Monitor tests. The tests are useful after servicing or after erasing a vehicle’s control module memory.
Component Test
This service enables bi-directional control of the ECM so that the diagnostic tool is able to transmit control commands to operate the vehicle systems. This function is useful in determining how well the ECM responds to a command.
Vehicle Information
The option displays the vehicle identification number (VIN), the calibration identification, and the calibration verification number (CVN), and other information of the test vehicle.
Vehicle Status
This item is used to check the current condition of the vehicle, including communication protocols of OBD II modules, retrieved codes amount, status of the Malfunction Indicator Light (MIL), and other additional information may be displayed.
Leave a Reply