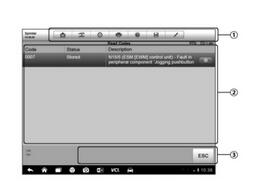
AUTEL MaxiSYS MS906TS Diagnostic Operation Diagnostics 38 Figure 4-9 Sample Read Code Screen
1. Diagnostic Toolbar Button – For a detailed description of the operation of each button, see Table 4-2 Diagnostic Toolbar button on page 29.
2. Main part ? Code column – Displays the code retrieved by the vehicle. ? Status column – Indicates the status of the retrieved code. ? Describe the column – a detailed description of the search code. ? Snowflake icon – Displayed only when you can view frozen frame data; selecting this icon will display a data screen that looks very similar to the read code interface and therefore may apply the same method of operation.
3. Function button – only the back (or sometimes ESC) button is available; click it to return to the previous screen or exit the function.4.6.3 Erase Code You can use this function to erase the vehicle’s code after reading the retrieved code from the vehicle and performing some repairs. Before performing this function, make sure that the ignition key of the vehicle is in the ON position when the engine is turned off.
Autel Tools MaxiSYS MS906TS from Youobd2.com Diagnostic Operation Diagnostics Erase Code
1. From the function menu, click Erase Code.
2. When this function is applied, a warning message will be displayed informing you that the data is missing. A) Click to continue. A confirmation screen will be displayed when the operation is completed successfully. B) click No to exit.
3. Click ESC to exit the erase code on the confirmation screen.
4. Perform the read code function again to check if the code erase is successful. 4.6.4 Real-time data When this function is selected, the screen displays the data list of the selected module. Items that can be used for any control module vary by vehicle. These parameters are displayed in the order in which they are transmitted, so the difference between the expected vehicles is expected. Gesture Scroll allows you to quickly move the data list. Just slide the screen up or down to find the data you need. The following figure shows a typical real-time data screen.
Leave a Reply